Ferro Backup System - The best Backup Software
Network Backup & Restore Software Solution for SMBs
 
  EN    PL    ES   


Article reference: FS-FBS-20160714-I01
Last revision: 13 July 2019
Version: 1.8


Ferro Backup System launch on NAS Synology server

The article discusses how to install archive server and client directly on NAS Synology drive

Ferro Backup System installed directly on NAS Synology drive

Requirements

  • NAS Synology server powered by x86-64 CPU (any Intel or AMD; not ARM)
  • 512 MB RAM
  • System Synology DSM 5.2 or higher
  • Ferro Backup System 5.1.1 or higher


Introduction

Before beginning of Ferro Backup System installation process on Synology NAS (hereinafter referred to as: host), install Synology Docker application. Additional application package installation is described at the device producer's website in the Install Packages article. Docker container creation procedure is described in Creating a container article.


See video: How to install backup server on Synology NAS


1. Image download

Log in to DSM Synology console, choose Main Menu -> Docker -> Registry, enter "ferro backup" or "ferro backup system" in the search field, and download "ferro/backupsystem" image.

Downloading Docker image - Ferro Backup System


2. Container creation

Go to Docker -> Image tab, select "ferro/backupsystem" and choose Launch with wizard command.

Fill in all fields indicated below in the container creation wizard. There are additional information in brackets (you don't have to rewrite it). For other, not mentioned fields, leave the default values

a) Server installation - if NAS server NAS will be used as backup server:
Container name: FBSServer (any name)

Advanced settings >> Volume -> Add folder
  File/folder: /Public/fbs (if such directory doesn't exist, create it) 
  Mount path: /fbs (it has to be exactly like that; it's case sensitive)
  Read only: No

Advanced settings >> Network
  Mode: HOST/bridge
  
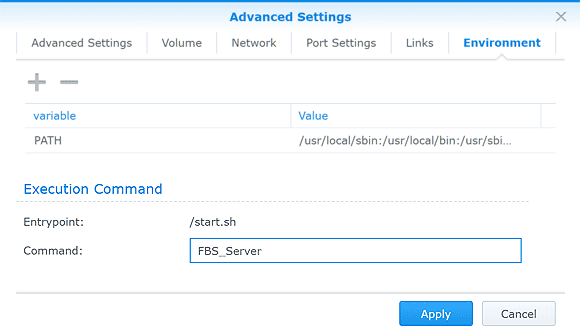
Advanced settings >> Environment
  Execution command: FBS_Server (it has to be exactly like that; it's case sensitive)
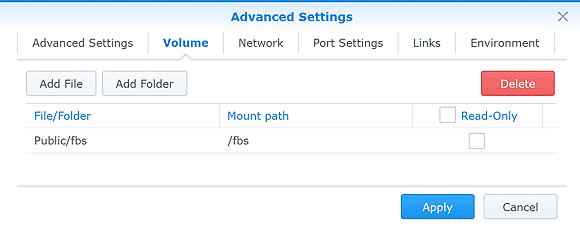

Volume - Ferro Backup System

Volume settings: /fbs (in container) = /Public/fbs (on host)
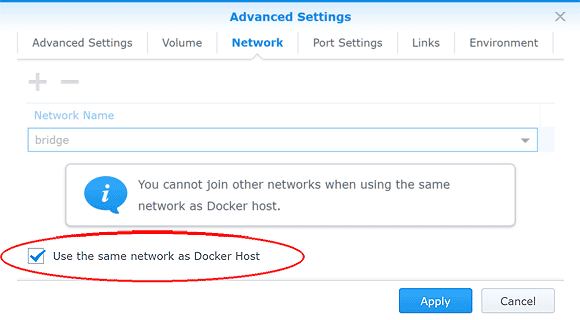

Network mode - Ferro Backup System

Network settings in HOST mode


Environment - Ferro Backup System

Execution command: FBS_Server (form a backup server) or FBS_Worker (for a client mode)


Backup server installation notes:
  • In order to connect the FBS Server control console, open the internet browser and type IP address of the host and 4530 port, e.g.:
    http://192.168.100.10:4530/
    
  • To store archives outside container, go to Settings -> Basic tab in Ferro Backup System - Server control panel and change path in Main Backup Location field to:
    Z:\fbs
    
    That setting enables access to archives from the host in the "/Public/fbs" shared directory or via Network Neighbourhood "\\YOUR_HOST_IP\Public\fbs"


b) Client installation - when files on the NAS server should be accessible for other backup server
Container name: FBSWorker (any name)

Advanced settings >> Environment
  Execution command: FBS_Worker (it has to be exactly like that; it's case sensitive)

Advance settings >> Volume -> Add folder
  File/folder: /Public/fbs (if such directory doesn't exist, create it)
  Mount path: /fbs (it has to be exactly like that; it's case sensitive)
  Read only: No

  File/folder: /Public (or any other folder from host)
  Mount path: /host (any name)
  Read only: No


Client installation notes:
  • To configure or modify target backup server, open "/Public/fbs/app/FBSWorker.ini" file in text editor and enter the IP address or server network name in the "HOST" line, e.g.:
    HOST=192.168.100.10
    
    After saving changes and restarting the container, FBS Worker automatically connects to the specified backup server.
  • Above-mentioned "Volume from host" can be backed up by using Z:\host folder or subfolder


3. Launching the container

Go to Docker -> Container tab, select created container and choose Start action. During first container launch, the latest Ferro Backup System version will be downloaded and installed.

You can track installation progress in Docker -> Container -> FBSServer -> Details -> Terminal window

Application is installed on NAS drive, in shared directory "/Public/fbs/app". The content of this directory can be browsed via Synology File Station or Network Neighbourhood "\\YOUR_NAS_IP\Public\fbs\app".
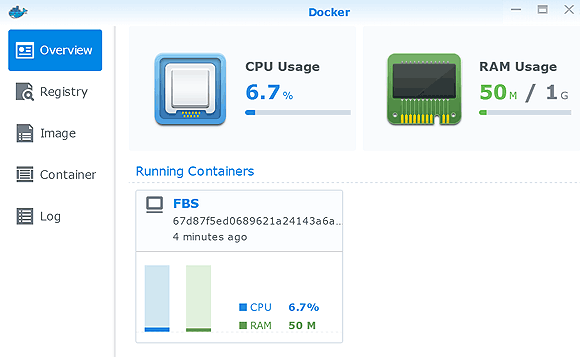

Ferro Backup System container launched on NAS Synology server

Ferro Backup System container launched on NAS Synology server


4. Updates

In most cases you can update only the FBS Worker or FBS Server application using built-in update mechanisms. Occasionally the whole container must be updated. Below you can see both scenarios.

a) Application update

After launching a new version of application follow the steps below: All settings and backup copies will be saved after update.


b) Container update

After launching a new version of container, follow the steps below:
  • Go to Docker -> Container tab, select container and choose Settings ->Export command (type: Container settings export)
  • Delete container
  • Download the container image once again, as described in this article, section 1. Image download
  • Go to Docker -> Container tab and select Settings -> Import command
If the application is installed — according to manual above — outside the container (in the "/Public/fbs/app" shared directory), all settings and backup copies will be saved after the update. However, if the application and backup copies are saved inside the container (there's no access to them via Synology File Station), before proceeding with the container update steps above, copy the settings (FBSDatabase.abs file) and backup copy folders (.FBF) outside the container. Contact our support team for detailed information.


See also

Home   Help   Where to Buy    Download    Contact Us   Partners   |  Printable version  |  Language: EN EN   PL PL

Install backup server and client on Synology NAS
All rights reserved.
Copyright © 2000-2022 FERRO Software