 Network Backup & Restore Software Solution for SMBs |
|||
| EN PL ES | |||
|
Article ref. no.: FS-FBS-20150227-I01
Last revised: 7 February 2015 Version : 1.0 Restoring VMWare ESX, ESXi virtual machines from backupRestoring virtual machines from backup onto VMWare ESX/ESXiTo restore a virtual machine from backup perform three simple steps: unpack the files, move the files to a selected host and register the machine. If the virtual machine has been restored onto a different location (different datastore or another host), settings may need to be updated, as described in section 4.1. Restore files from backupIn the FBS Server console go to the Recovery tab and select the machine on which the ESX host backup was performed. Then in the "Backups" box tick the desired backup item. In the "Backup contents" box choose the directory with the corresponding virtual machine name and click on "Unpack files".
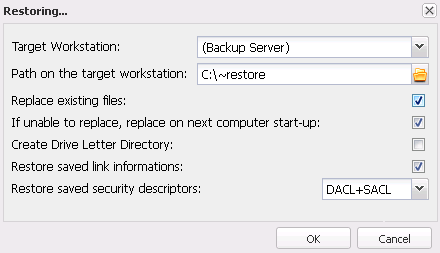
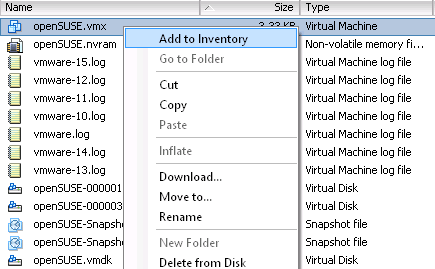
Fig. 1 FBS Server – Recovery window In the "Recovery" window select the backup server (first item on the list) or another machine as the target workstation. In the "Target workstation path" select the directory to unpack the files to and click on OK. 2. Move the files to the selected ESX hostCopy the virtual machine files to the ESX/ESXi host datastore using the vSphere Client utility (command: Upload files to this datastore) or another method of your choice e.g. SCP, SFTP, CIFS, NFS.3. Register and launch the virtual machineUsing the vSphere Client utility go to the datastore path where the virtual machine files have been uploaded, find the .VMX file, right click on it and select "Add to Inventory".
Fig. 2 vSphere Client – registering a virtual machine After completing this operation you can run the virtual machine or restore it from available snapshots. After first launch the vSphere Client utility will ask if the machine has been moved or copied. If an older version of a recovered machine still exists on the same ESX hosted, click on “copied”. If the original virtual machine is no longer on the ESX host, click on “moved”. 4. (Optional) Update virtual drive file pathsIf the virtual machine files, particularly virtual drive files .VMDK, are stored separately (in different datastores) from the .VMX file and are recovered to a different datastore than originally, those paths need to be updated in the .VMX file prior to the launch of the virtual machine.
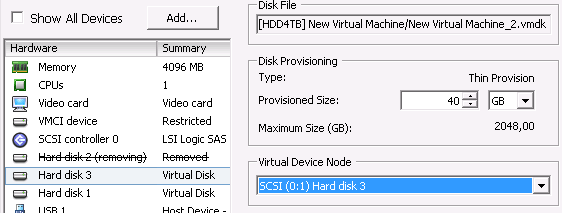
Fig. 3 vSphere Client – VMDK file path update To update virtual disk paths go to the virtual machine settings window in the vSphere Client utility, find the currently unavailable hard disk, write down the "Virtual Disk Node" (e.g. SCSI 0:1 or IDE 1:1) and then remove the disk from the virtual machine settings. Then click on “Add hard disk” and in the “Add disk wizard” point to the path of the .VMDK file. After adding the new hard disk set its "Virtual Disk Node" so as to reflect the node of the removed drive. Repeat for all drives for which ESX yields the “no VMDK file error”. See also |
||
| Home Help Where to Buy
Download
Contact Us
Partners |
Printable version |
Language: EN |
|||
|
Restoring VMWare ESX, ESXi virtual machines from backup All rights reserved. Terms and Conditions | Privacy Policy Copyright © 2000-2024 FERRO Software |
|||

